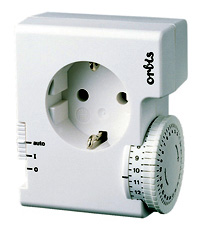
APPLICATIONS:
- Introduce the weekly timer plug (attached to it) into
the power outlet.
- Define present hour and day turning the drum till the
hour shop exacly on the white line positioned aside the
disk.
- Move all of the bascules towards the top (stand-by position).
- Program moving the bascules towards the botton in correspondence
of the working hour (dialface on the plate of the drum).
Every bascules corresponds to 3 and half hours.
- Introduce the user into the weekly timer plug.
- Consequently any weekly timer switches must be ON.
FUNCTION OF THE SWITCH POSITIONED ON THE
LEFT SIDE OF THE TIMER.
AUTO position: in the position the ON/OFF
programming, established on the drum, is working.
Position I: the timer is always ON. Programming
is cut out.
Position 0: the timer is always ON. Programming
is cut out. The switch is particularly useful when working
manually. As a matter of fact, instead of moving the bascules
it is enough acting on the switch to abtain always ON/ always
OFF position. |